Monday, 27 June 2011

Locations - The Patriot City Police Department Lobby

With numerous scenes featuring unique interiors, a major part of pre-production involved finding locations which would suit them.

The hunt was on and the search was tough, but the production lucked out when they were very kindly offered the use of a 70s building called Kay House, an unused part of the local university campus which was due for re-modelling.
The building was formerly a catering and entertainment block and as such contained a great variety of interesting spaces - including a ballroom, which would come in very useful later on.

After the initial tour of the building it became clear to Tom and Ben that its usage would answer many of their prayers and so, Kay House was used for the majority of the main locations in the film. Most important of which was the Patriot City Police Department itself.

The ground floor of the Kay, which would later become the lobby of the PCPD

The ground floor of Kay House held an entrance hall and a vast hallway which would quickly become the basis for the PCPD lobby.

As an added bonus, much of the furniture that remained inside the building could be used to dress the sets - Tom, Jonts, Claire and Ben, quickly rearranged the aesthetics; moving out several heavy duty catering tables and replacing them with an assortment of chairs.
This formed the public waiting area, where citizens of Patriot City and Police officers could mingle and chat.

A tidy lobby, with chairs arranged and equipment being brought in for the first day of shooting

Once the main lobby had been tidied and laid out, it needed to be dressed appropriately.

What was formerly a small shop, became the reception office; intended for public enquiries and where Patriot City criminals would be booked in.

Officer Grant Patent resting in the Reception Office

Hours were spent creating original documents and posters to litter the desk and walls of the main lobby.
Although never legible in the film itself, Tom and Ben tailored each poster specifically to try and make each other laugh.  Almost all of them contain jokes and obscure references that would never be noticed by anyone outside the project.

This attention to detail was important in many ways, as it was the belief of the production team that each little thing would improve the whole and time spent scrutinizing even the smallest of props, would in turn bolster the overall quality of the production.

I also gave people new to the set something interesting to look at and much time was spent reading the scraps of paper stuck to walls.

As an interesting side note, whenever a large amount of generic text was required for files and documents, a mixture of lyrics from the theme songs of popular 70s television shows was used.

Here are a selection of posters from the lobby:


With the main lobby completed, the production team moved on to the rest of the locations - and shooting could soon commence.

Here are some pictures from the production, featuring many of the talented crew and actors that so kindly graced our sets.

Chief Rappappaport looks out on the lobby

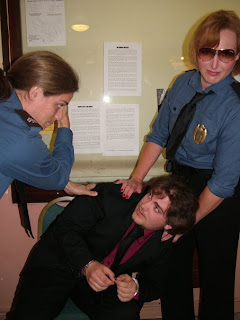
Two diligent PCPD officers

Patriot City's finest

Extras on set

Marty McFeathers takes a beating

Tom with some of the cast

An improvised Dolly, made from a tea cart (note: wood gaffa taped to wheels, to stop them swivelling)

Cop Killa being released from custody

The Lobby, as seen from inside Chief Rappappaport's office.


Monday, 20 June 2011

PCPD Badges

A week before principle photography began, Crash and Burn's costumes were ready and rehearsals were underway.
However, it was suddenly clear that an iconic emblem of Patriot City was missing - the Shields themselves. 

Shield of Justice

Up until this point, Crash and Burn had been wearing silver star badges that looked tacky and cheap.
The original idea was that it would be funny to have the main characters sporting such naff props.  With the overall upscaling of the costume however, it was clear they would not cut it.

Initially the idea was to order some pre-made replica badges from a professional company, however cost was an inhibiting factor - the other officers in the PCPD would need badges too and it would be preferable to have a unique badge for the actors to wear.

An emergency meeting was convened in a local pub were Tom and Ben Decided that the best option would be to cast their own badges in polymer resin.
Several ideas were knocked about, all reflecting the Totalitarian imagery they wanted Patriot City to reflect.


Stars and stripes, eagles, cityscapes and statues of justice were all popular themes, but it was a simple design Tom had scrawled on the back of a receipt that they settled on.

Ben took the rudimentary sketch and refined it into a scale technical drawing. 


Ben's original drawing.


He then carved a rough template out of a block of insulation foam.
Shooting had already begun now and most of the work was carried out in the ungodly hours of the morning.

At this point, Ben wasn't sure if it would work.

At this point, Ben still wasn't sure if it would work.

Okay, looking better.

More detail.

Blurry shot of it at the end of step one.

Alongside the foam negative, two more rough badges were hewn out - intended for use as stand ins for any distance shots Crash and Burn might appear in.  These still appear in the finished film, barely noticeable at distance from the real thing.


The foam base was then coated in modelling clay and many hours were spent shaping it into the basic shape of the badge.  Unfortunately the clay used wasn't the most suitable and the process involved much swearing and some blood.


I hope this isn't Chris's blood!
Sculpty sculpty.
more sculpting.

Looking better
Adding windows

Finally there.
With the clay model finished, Ben sealed it with a thin coat of varnish to waterproof it.
He then prepared to mix up the RTV Silicon from which the would would be made.

Ready to mix up some toxic goop!
The negative was attached to the base of a plastic tray with some double-sided tape and Ben painted a thin layer of Vaseline onto the model to act as a release agent.

Ben was really worried that it wouldn't work.
As usual with mould making, an ideal situation would be to remove air from the silicone using a vacuum.
However, Ben didn't have the necessary equipment and with filming taking place the next day, he instead improvised - applying the first layer of silicone with a syringe - squeezing it into the detailed areas and forcing out the air.

Once the first layer was done, the rest of the silicon was poured in to make the rest of the mould.

One of those moments in life that proceeds potential failure.

Is that good? Is it meant to look like that?
After the silicone had set, Ben nervously removed the clay model from the negative.

Well, both survived.

One bubble, but impossible to tell if it worked yet.

A small batch of epoxy resin was mixed up to test the mould with, ruining at least one perfectly good teacup.
The mould was then sprayed with CIL release agent before casting commenced.


Polymer resin - don't eat it!
After a few minutes (and once the resin was all lovely and warm) Ben removed the casting from the negative.
Hallelujah! It worked!


One nasty bubble, but easily repaired.

Crash and Burn's badges, fresh from the mould.

The badges were given a quick clean up to remove any flash, before being dusted with some gold paint.


Shiny!
The badge backs were then clumsily constructed from card and leather-effect PVC.


This would eventually get dropped in a toilet half-way through shooting.

With filming only a few hours away now, Ben went to bed - stinking of thinner and silicone.


A finished shield.
The next day several more badges were cast and painted on location, as extras were getting ready.


The badges were also lacquered to give a deeper shine to them, though oddly this didn't translate well onto film.
After the first shoot Ben took the badges home and gave them a dark 'wash' of paint - pulling up the detail. 
They were then drybrushed with gold, silver and bronze - before having a green/blue wash and another coat of lacquer.

This cartoony look, came out much better on the screen.


Crash and Burn with their finished 'Shields of Justice'.

Monday, 6 June 2011

Cop Killa's Costume


So what does a forty-something, gun-toting, kumquat munching, raincoat shuffler actually wear? During Pre-production many design ideas were bounced around for Cop Killa's costume, but the one image which always remained was the long bullet riddled trench coat.

Rough costume sketch by Ben

A good trenchcoat is hard to find, especially when budget is tight and it was several weeks before the perfect example was found hanging in a charity shop window.

Very quickly Tom and Ben took the new purchase home and got to work distressing it. Most of the inner lining was removed and every clean edge was tortured and scuffed with rasps, sandpaper and graters.
 
Moderately damaged with a few bullet holes
 
Lots of personal injury occured whilst using the rasps

The whole coat was then covered with carefully placed bullet holes which were individually dry-brushed before the whole coat was put through numerous paint washes to add depth and achieve the lived-in look of vagrancy. Paints were thinned down and literally soaked into the jacket to simulate filth and mould.

A wash of scum drying in the sun
This part would be sweaty

Key areas were then dusted with black paint to break up the beige outline and create patches of sweat.  Burnt patches were sprayed around bullet holes and tears and were then highlighted with dry-brushing.


Disgusting
 
With the signature coat ready, it was a pair of dark brown pinstripe trousers and solid boots that would make the base of Cop Killa's costume.

After several unsuccessful choices, a beige safari shirt and a black shooting vest were supplied by Jonty (the actor playing Cop Killa) to provide the upper half of his outfit.
The shirt was given a similar paint treatment to the coat, and soon all the pockets were filled with dried plasters, used condoms and Cop Killa's seedy wallet.

Other accessories added to the character were a set of gold teeth (that Jonty used when portraying Jack Sparrow) and an anachronistic medallion, emblazoned with the crest of Exeter -  Tom and Ben's home city where the majority of shooting took place.

Cop Killa's costume nearly complete
It was only during rehearsals, a week before principle photography when everyone decided that Cop Killa definitely needed a hat.
A hat had never been considered before but now it seemed obvious, Cop Killa would simply not be complete without one. Luckily Jonty was able to provide a beige trilby which matched the coat perfectly, Tom promptly took it home and  went to work on it. 

He gave it a similar treatment as the coat, beating the shape out of it, roughening the edges, tearing off chunks and adding bullet holes and grazes. With just days to spare the hat was stained and painted and dried out just in time for the first day of shooting.

The finished hat
Once the hat was complete, the final piece of Cop Killa's costume to construct was a necklace made of shattered bronze cop badges, scratched and split by the bullets from his mighty weapon.  
These were quickly constructed from some toy police badges; chopped and painted to look old and weathered.

The badges with medallion
That being done, CK was finally complete, ready to wage war against the good and righteous of Patriot City.


The complete Cop Killa, in all his fury

And then, when the crying had ceased and the wind had settled, we knew that Cop Killa was ready for shooting, and so began the legend.